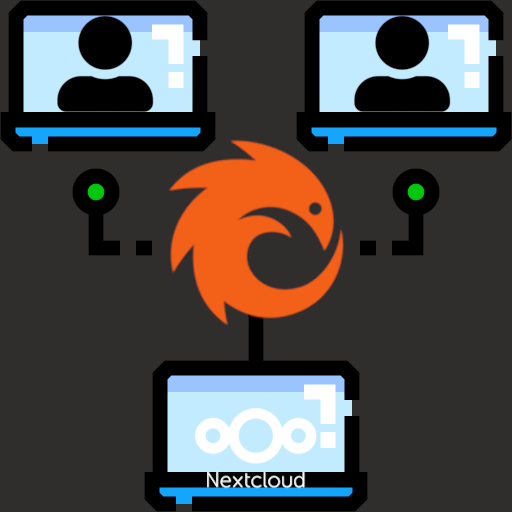
Accessing a server at home has always been a risk for many to expose their servers to attacks coming from the web directly into their homes. Nowadays, many solutions exist to counter this fear such as Cloudflare tunnels, VPNs, Tailscale/Headscale. Yet, Pangolin has taken the little world of homelabs by storm with an easy-to-use yet secure solution: setting up an interface between your server at home and the web.
Pre-requisites Link to heading
Prior to installing Pangolin you well need to get a static IP address from your ISP (or configure a dynamic DNS configuration) secure your remote server the usual ways while keeping certain ports open as well as a domain name, a subdomain specified for Pangolin and a wildcard for any other subdomains (meaning Pangolin will be able to set subdomains for the many services you will want to access).
Open ports 80, 443 and UDP 51820 (here we are using UFW as firewall):
  sudo ufw 80
  sudo ufw 443
  sudo ufw 51820/UDP
On your domain registrar, add two DNS records for your domain:
To access Pangolin
Type: A - Address record
Host: pagolin.your_domain.xyz
Answer/Value: your_server_ip
Wildcard subdomains
Type: A - Address record
Host: *.your_domain.xyz
Answer/Value: your_server_ip
Installing and setting up Pangolin Link to heading
Installing and running Pangolin inside a Docker container is pretty straightforward, we are going to create a folder for our installation on the remote server, then we will get the installer which will install everything to our comfort:
  mkdir pangolin
  wget -O installer "https://github.com/fosrl/pangolin/releases/download/1.2.0/installer_linux_$(uname -m | sed 's/x86_64/amd64/;s/aarch64/arm64/')" && chmod +x ./installer
  sudo ./installer
You will now be presented with a series of questions to configure your Pangolin.
Base domain name: your_domain.xyz
Dashboard domain name: pangolin.your_domain.xyz
Let’s Encrypt email: An email for SSL registration with Let’s Encrypt
Tunneling: Use default option Gerbil as a tunnel
Admin email: Email for Pangolin login as an administrator Admin password
Disable signup without invite: Leave yes as default so that you are in control of who signs up Disable users from creating organizations: yes if you need to be the only one in charge
Email functionality: no except if you want to get notifications for example (it will require SMTP configuration). Install Docker: yes. The installer will detect if Docker is not install and ask if you will let it install Docker
Install and start containers: yes
Install Crowdsec: no. If you know how to manage Crowdsec (which basically identifies and bans malicious IPs). If you already have setup fail2ban you can forego this option.
You can now login to your Pangolin install at pangolin.your_domain.xyz. The first thing you will notice is that your SSL certificate is set.
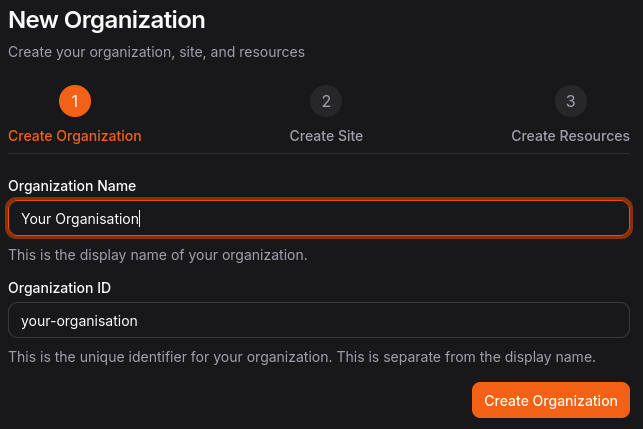
Now let’s create an organisation, our tunnel and our first access to a webapp on our homelab.
Tunneling to your home server’s apps Link to heading
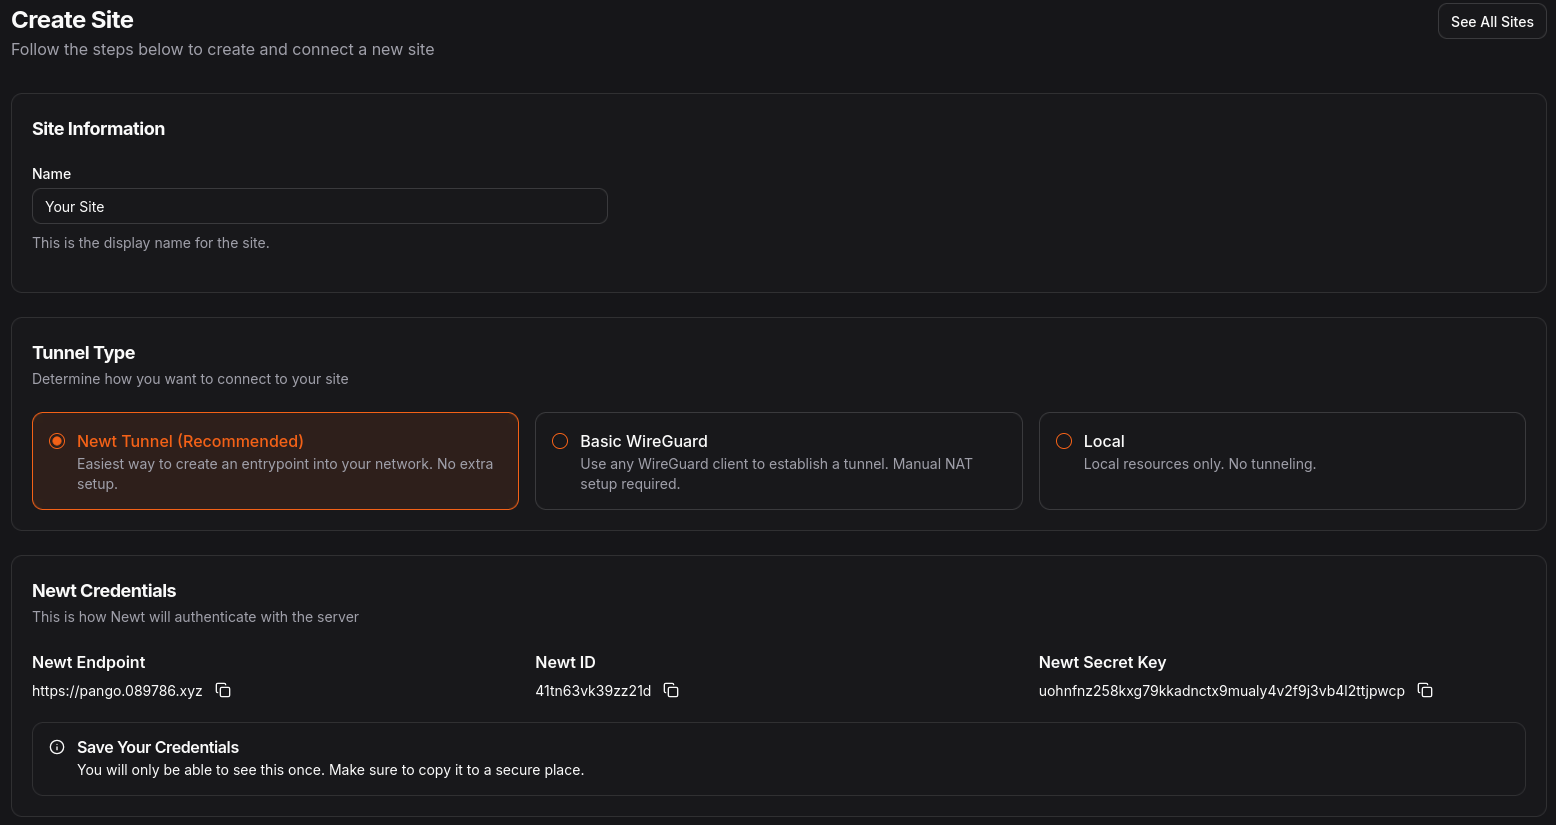
Set up the organisation name and ID and on the next screen we will define a site, that is the tunnel to connect to our homelab. Input a name and then Newt Tunnel as tunnel type and write down somewhere the credentials
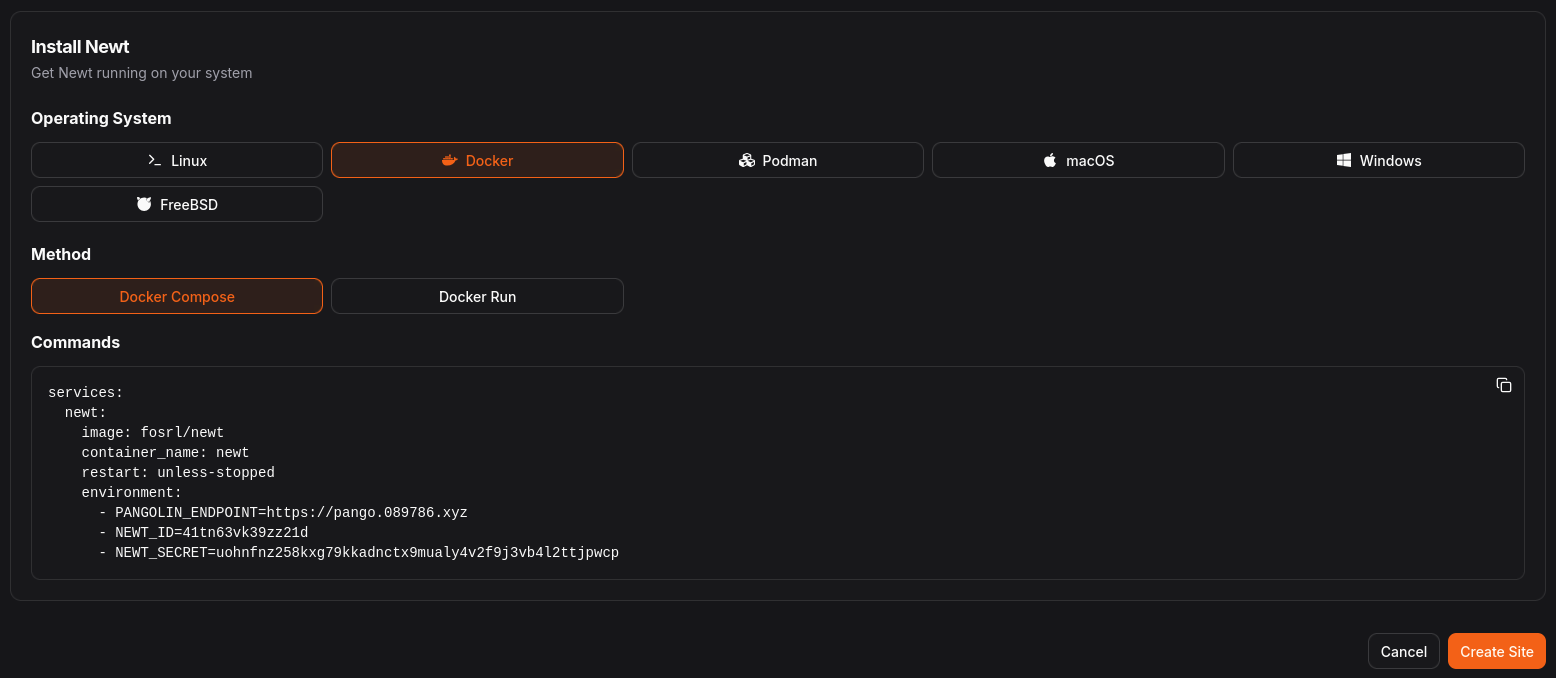
Now we must install Newt on our server at home and to do so select Docker as operating system, Docker Compose as the Method and finally create a docker compose file on your home server, copy the commands and run the container:
nano docker-compose.yaml
  services:
    newt:
      image: fosrl/newt
      container_name: newt
      restart: unless-stopped
      environment:
        - PANGOLIN_ENDPOINT=https://pangolin.your_domain.xyz
        - NEWT_ID=your_newt_id
        - NEWT_SECRET=your_newt_secret
Wait a moment to refresh your Pangolin site settings page and see your site come Online.

You are all set to create proxies to your homelab apps.
Let’s move onto our very first proxy to our webapp application. For this example, we’ll aim at using a Nextcloud server; now contrary to other webapps, we will leave the remove Pangolin’s authentication process, meaning you will be able to access your Nextcloud instance without having to be logged in Pangolin. This is necessary to log in Nextcloud mobile and desktop apps and because does not have custom proxy headers such as is the case with Immich photo and video server (see here for an example).
Go to Ressources under your organisation and add a new one. Give it a name, select your site, HTTPS Resource as ressource type and finally write the subdomain you want your app to be available at: a_subdomain.your_domain.xyz and click on this new subdomain under Organization Domains.
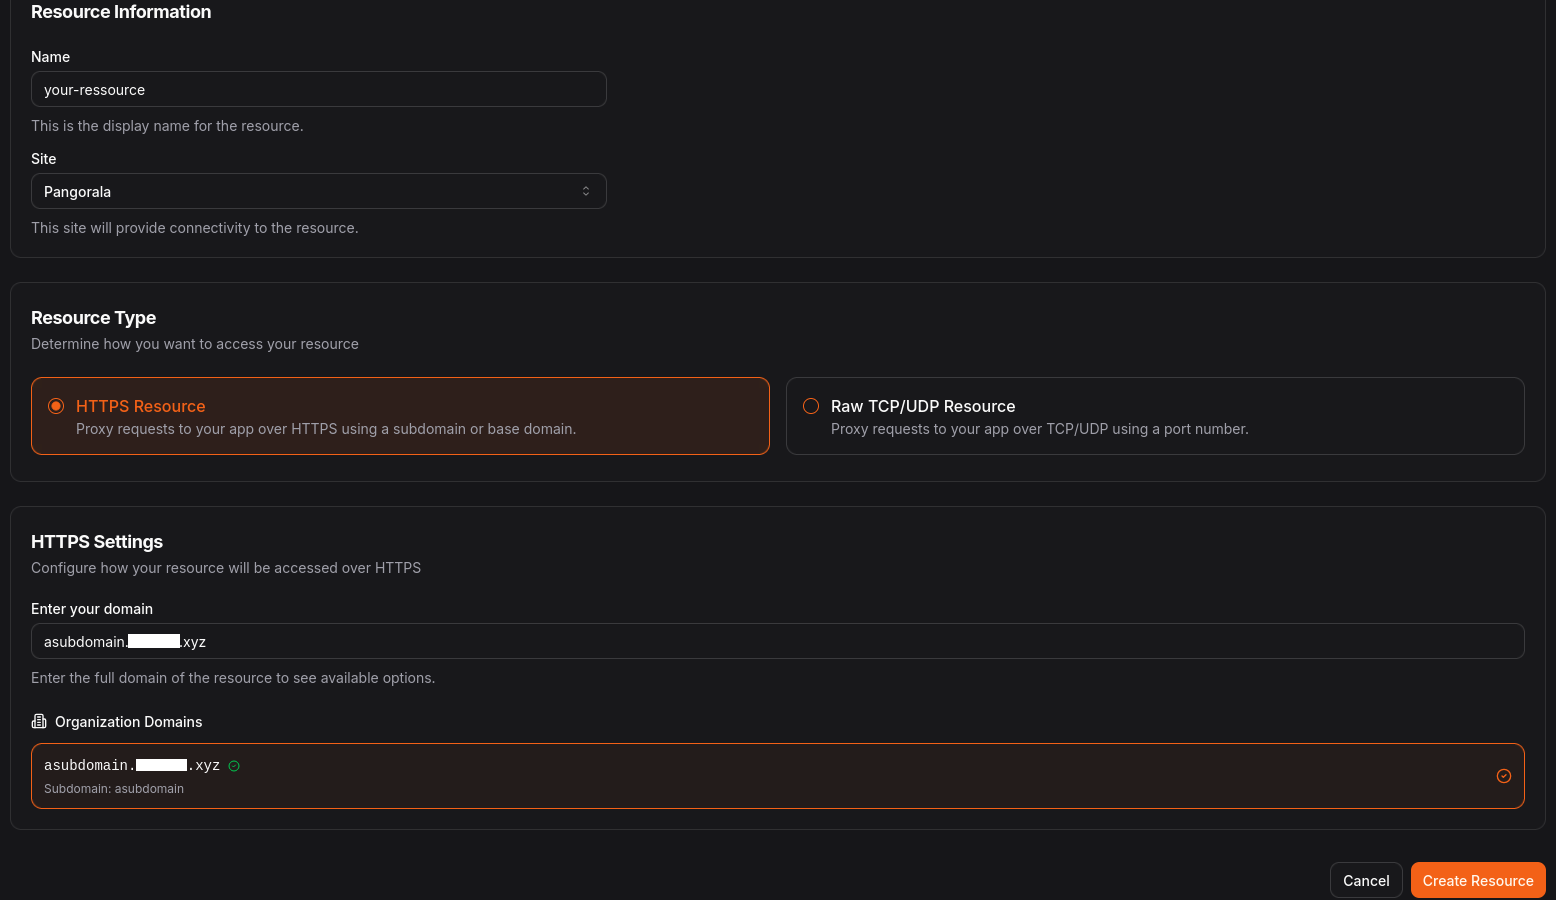
And Create Ressource.
On the next screen, you will define targets configuration i.e. where to tunnel to. So inside Proxy and Targets Configuration, add your Nextcloud’s IP/hostname address, then port on which our Nextcloud server will be accessible: here we choose 8080.

Next, click on Authentication, uncheck Use Platform SSO and Save Users & Roles so we can access Nextcloud’s server directly.

Installing Nextcloud with the proper configuration for Pangolin Link to heading
Here we will take a quick break from our remote server to concentrate on installing Nextcloud server on our homelab; spinning up two Docker containers (make sure Docker is installed on your home server): one for a MySQL server, MariaDB, and the other for Nextcloud. And finally configuring Nextcloud to play nice with Pangolin as a proxy tunnel.
Create a Docker Compose file and insert the following configuration:
nano docker-compose.yaml
  services:
    nextcloud:
      container_name: nextcloud
      restart: unless-stopped
      image: nextcloud
      ports:
        - 8080:80
      volumes:
        - /containers/cloud/nextcloud/apps:/var/www/html/apps
        - /containers/cloud/nextcloud/config:/var/www/html/config
        - /containers/cloud/nextcloud/data:/var/www/html/data
      depends_on:
        - db

    db:
      container_name: maria-db
      restart: unless-stopped
      image: mariadb
      environment:
        MYSQL_ROOT_PASSWORD: root
        MYSQL_DATABASE: ncdb
        MYSQL_USER: nextcloud
        MYSQL_PASSWORD: nextcloud
      volumes:
        - /containers/cloud/mariadb:/var/lib/mysql
Nextcloud needs to be hooked up on port 80 inside the Docker, but to access it from outside the container we use port 8080 (this leaves us free of port 80 to use with other applications that are a headache to budge from this port such as PiHole). As you can see, Docker will create the necessary files on our server and then copy these files into the containers, this means we will be able to make modifications to Nextcloud configuration files inside /containers/cloud/nextcloud/config/ and then restart Docker Compose for the changes to be added.
But first run our Docker configuration once:
docker compose up
Then press Ctrl+C to stop.
Edit config.php file for Nextcloud:
sudo nano /containers/cloud/nextcloud/config/config.php
  <?php
  $CONFIG = array (
    'htaccess.RewriteBase' => '/',
    'memcache.local' => '\\OC\\Memcache\\APCu',
    'apps_paths' =>
    array (
      0 =>
      array (
        'path' => '/var/www/html/apps',
        'url' => '/apps',
        'writable' => false,
      ),
      1 =>
      array (
        'path' => '/var/www/html/custom_apps',
        'url' => '/custom_apps',
        'writable' => true,
      ),
    ),
    'upgrade.disable-web' => true,
    'instanceid' => 'your_instance_id',
    'passwordsalt' => 'your_passwordsalt',
    'secret' => 'your_secret',
    'trusted_domains' =>
    array (
      0 => 'your.homelab.ip.address', //to access your nextcloud inside your local network
      1 => 'a_subdomain.your_domain.xyz',
    ),
    'trusted_proxies' =>
    array (
      0 => 'ip.address.of.pangolin.server',
    ),
    'overwrite.cli.url' => 'https://a_subdomain.your_domain.xyz',
    'overwriteprotocol' => 'https',
    'forwarded_for_headers' =>
    array (
      0 => 'HTTP_X_FORWARDED',
      1 => 'HTTP_FORWARDED_FOR',
    ),
    'datadirectory' => '/var/www/html/data',
    'dbtype' => 'mysql',
    'version' => '31.0.7.1',
    'dbname' => 'ncdb',
    'dbhost' => 'maria-db',
    'dbport' => '',
    'dbtableprefix' => 'oc_',
    'mysql.utf8mb4' => true,
    'dbuser' => 'nextcloud',
    'dbpassword' => 'nextcloud',
    'installed' => true,
    'loglevel' => 0,
  );
Here we made a few changes from the default config file. We added/changed the following:
trusted_domain: your.homelab.ip.address and a_subdomain.your_domain.xyz
trusted_proxies: a_subdomain.your_domain.xyz
overwrite.cli.url to point to our https://a_subdomain.your_domain.xyz
overwriteprotocol => https
forwarded_for_headers
Restart Nextcloud’s Docker Compose docker compose up -d and put it in the background and you should be able to connect to it through a_subdomain.your_domain.xyz as well as using Nextcloud client applications to access your server.
A word of warning, when you created your Nextcloud admin account, missing the email might result in a tiny headache when setting up the email server (here we mean sending emails through a third party email provider). Before doing so, make sure your account (under /settings/user) has the same email address as the one you will be using in the email server otherwise you will get an error.
Afterword Link to heading
Following the same steps you can now access any service hosted on your server at home. In a following post, We’ll see how we can access web apps requiring open ports; such is the case of Forgejo.